📖 A Trail Story: Seven Miles from the Trailhead
Day four of a seven-day trek through the Bob Marshall Wilderness, and we were making good time along the South Fork of the Sun River. That's when I heard the shout from behind. Jake, a sixteen-year-old on his first backcountry trip, had stepped wrong coming down a rocky section—his ankle rolled hard on a loose stone, and he went down immediately.
By the time I reached him, the ankle was already swelling. He couldn't put any weight on it without wincing. We were seven miles from the nearest trailhead, two days from our planned exit, and cell service was a distant memory. This is where your first aid training stops being abstract knowledge and becomes the difference between a manageable situation and a crisis.
I stabilized Jake on the trail, elevated his leg on his pack, and applied a cold compress using a water bladder from the creek. After assessing for fracture (no deformity, pulse intact below the injury, limited range of motion but not impossible), I diagnosed it as a severe Grade 2 sprain. We wrapped the ankle with an elastic bandage in a figure-eight pattern, packed the boot with extra socks for support, and fashioned a walking aid from a sturdy branch.
Over the next 36 hours, we made our way out slowly—Jake on one trekking pole and his improvised crutch, taking breaks every half mile to ice the ankle in creek crossings and re-wrap. We rotated pack weight among the group, kept his spirits up with trail snacks and stories, and monitored constantly for signs the injury was worsening. When we finally reached the trailhead, Jake walked to the car on his own two feet. That ankle taught me something I already knew but needed to remember: proper field treatment and a solid evacuation plan can turn a potential disaster into just another trail story.
📋 What's Covered in This Guide
- When to Evacuate Immediately
- Blisters: Prevention & Treatment
- Cuts & Lacerations
- Sprains, Strains & Joint Injuries
- Insect Bites & Stings
- Burns (Fire, Sun & Heat)
- Hypothermia & Frostbite
- Dehydration & Heat-Related Illness
- Fractures & Broken Bones
- Recognizing & Treating Shock
- Essential First Aid Kit Items
🎓 About This Guide
I spent over 100 days per year in the backcountry for over a decade as a wilderness guide. This guide draws from real field experience treating injuries miles from the nearest road, often in less-than-ideal conditions. While I hope you never need to use these skills, being prepared can literally save lives—including your own.
Important: This guide is educational and does not replace formal medicine training. I strongly recommend taking a Wilderness First Aid (WFA) or Wilderness First Responder (WFR) course before heading into remote areas.
⚠️ When to Evacuate Immediately
🚨 Critical Situations Requiring Immediate Evacuation:
- Severe or uncontrolled bleeding – especially arterial bleeding
- Signs of shock – pale/clammy skin, rapid weak pulse, altered mental status
- Head injury with loss of consciousness – even brief
- Suspected spinal injury – neck/back pain after fall or trauma
- Difficulty breathing or chest pain – could indicate heart attack or pneumothorax
- Severe allergic reaction (anaphylaxis) – swelling of face/throat, difficulty breathing
- Compound fractures – bone protruding through skin
- Severe hypothermia – core temperature below 90°F, no shivering
- Heat stroke – hot dry skin, no sweating, confusion or unconsciousness
- Altered consciousness – confusion, unresponsiveness, seizures
- Severe abdominal pain – could indicate internal bleeding or organ damage
In these situations, your priority shifts from treatment to evacuation. Stabilize the patient as best you can, activate your emergency communication device (satellite messenger, PLB, or InReach), and prepare for extraction. Time is critical.
🩹 Blisters: Prevention & Treatment
Blisters might seem minor, but in the backcountry, they can end your trip early or lead to serious infection. After treating hundreds of blister cases, I've learned that prevention is exponentially easier than treatment.
Prevention Strategies
- Boot Selection & Break-In: Your boots should be broken in over at least 50 miles before a big trip. They should fit snugly in the heel with room to wiggle toes. Never buy boots the day before a trip.
- Sock System: Use moisture-wicking liner socks (merino or synthetic) under thicker hiking socks. Change socks when they get damp—carry at least 3 pairs on multi-day trips.
- Early Intervention: At the first sign of a "hot spot" (redness, warmth, tenderness), STOP and address it. Apply leukotape or moleskin over the area before a blister forms.
- Foot Care: Keep feet dry, air them out during breaks, use foot powder if prone to sweating, and trim toenails before trips (but not too short).
Treatment: Intact Blisters
- Don't pop it unless absolutely necessary (very large, painful, or will rupture anyway)
- Clean the area with soap and water or antiseptic wipe
- Cut a donut-shaped piece of moleskin with a hole for the blister
- Apply the moleskin around (not on top of) the blister to reduce pressure
- Cover with a second layer of moleskin or tape for protection
- Change dressing daily and monitor for signs of infection
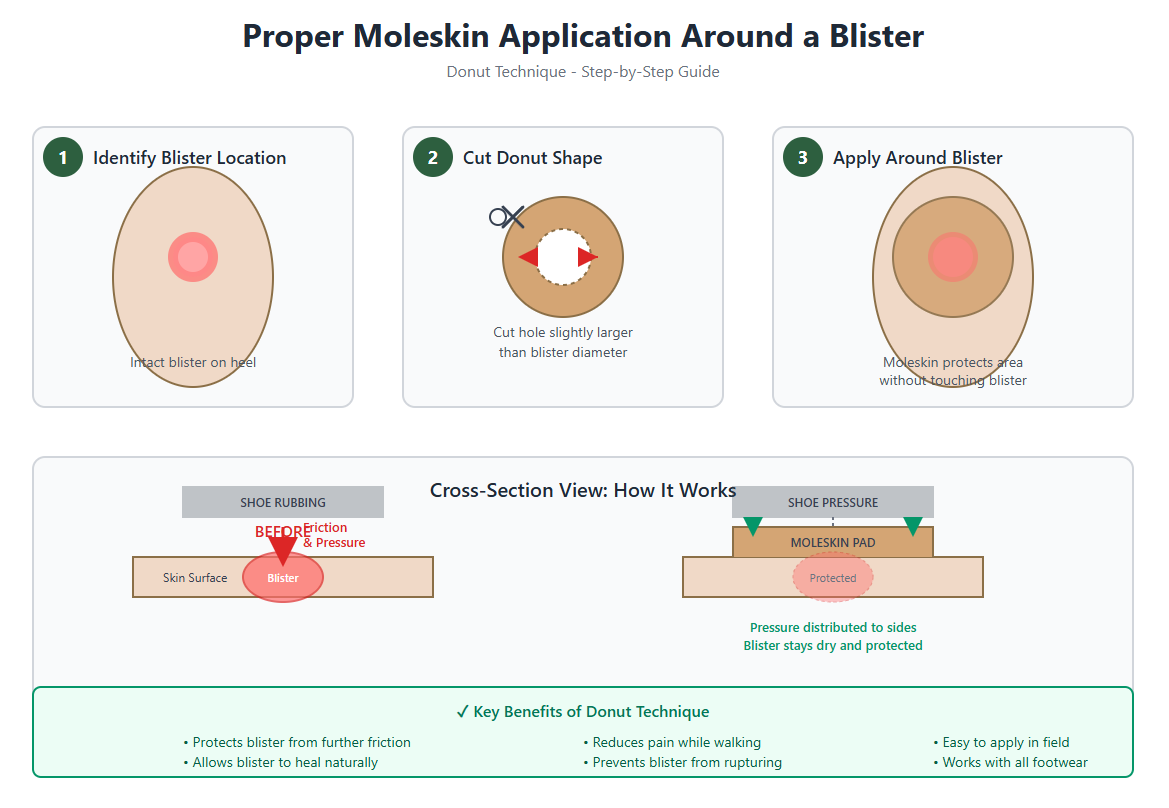
Step-by-step guide to applying moleskin in a donut pattern around an intact blister to protect it from friction while allowing natural healing.
🔍 Click image to view full size
Treatment: Drained or Popped Blisters
- Clean thoroughly with soap and water (or betadine if available)
- If you must drain it: sterilize a needle with flame/alcohol, pierce at the edge, gently press out fluid, leave roof of blister intact
- Apply antibiotic ointment (Bacitracin)
- Cover with non-stick gauze pad (not cotton—it will stick to the wound)
- Secure with medical tape or second skin
- Change dressing twice daily, reapply antibiotic ointment
⚠️ Watch for Infection
Signs of infection include: increasing redness spreading beyond the blister, warmth, swelling, pus or cloudy drainage, red streaks extending up the foot or leg, fever. If infection develops, increase wound care frequency, keep the area clean and dry, and consider evacuation if it worsens—cellulitis can become serious quickly in the backcountry.
🔪 Cuts & Lacerations
From knife slips while processing firewood to falls on sharp rocks, lacerations are common in the backcountry. The key is controlling bleeding, preventing infection, and knowing when a wound needs professional closure.
Immediate Response to Bleeding
- Apply direct pressure: Use the cleanest cloth available (gauze, bandana, shirt) and press firmly for 5-10 minutes without peeking
- Elevate the wound: If possible, raise it above the heart to slow blood flow
- Don't remove the first cloth: If it soaks through, add more material on top—removing it disrupts clot formation
- Use pressure points only if needed: For severe bleeding that won't stop with direct pressure, compress the artery between the wound and heart
🚨 Arterial Bleeding
Bright red blood that spurts with each heartbeat indicates arterial bleeding. This is life-threatening. Apply maximum direct pressure, consider a tourniquet if it's a limb and pressure isn't working (mark the time applied), and evacuate immediately. Don't waste time—seconds matter.
Wound Cleaning & Assessment
Once bleeding is controlled:
- Irrigate thoroughly: Use clean water (filtered or boiled and cooled) to flush out dirt, debris, and bacteria. Use a syringe or irrigation bottle if available—high pressure irrigation is ideal
-
Assess depth and damage:
- Shallow cuts (<¼ inch deep): Can be treated in the field
- Deep cuts (can see fat or muscle): May need evacuation for stitches
- Cuts over joints: High infection risk, consider evacuation
- Check for tendon/nerve damage: Can the person move and feel normally below the wound?
Wound Closure Techniques
For Shallow to Moderate Cuts:
- Butterfly strips (Steri-Strips): Clean and dry the wound edges, apply strips perpendicular to the cut, bringing edges together (not overlapping), place strips every ¼ inch along the wound
- Adhesive wound closures: Similar to butterfly strips but with better adhesion—ideal for areas that move
- Liquid bandage: Good for small cuts on fingers or areas that get wet frequently
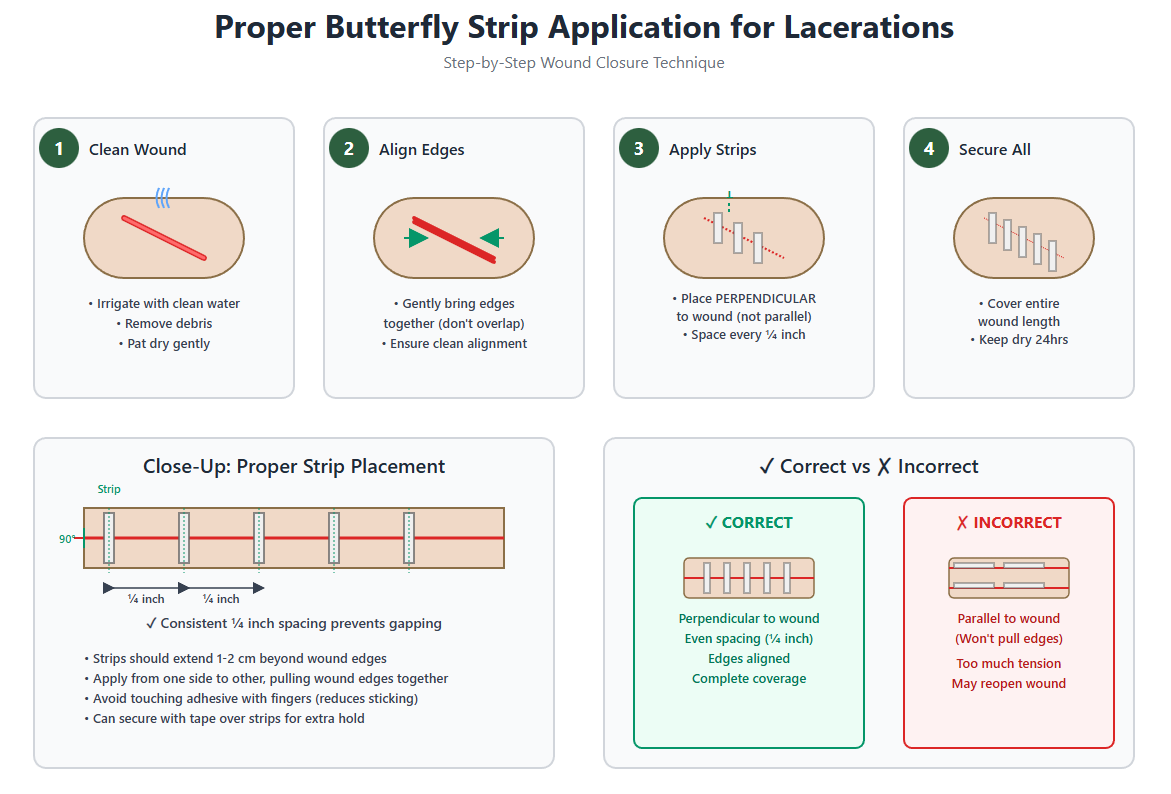
Step-by-step guide to applying butterfly strips perpendicular to lacerations with proper spacing every ¼ inch for optimal wound closure.
🔍 Click image to view full size
Wound Care Protocol
- After closure, apply antibiotic ointment (prevents infection and keeps wound moist for healing)
- Cover with sterile non-stick gauze pad
- Secure with medical tape or elastic wrap (not too tight)
- Change dressing 1-2 times daily
- Inspect for signs of infection at each change
- Keep wound dry—use waterproof covering if needed for creek crossings
⚠️ Signs You Need to Evacuate
- Wound won't stop bleeding after 15 minutes of pressure
- Deep gaping wound that won't stay closed with field techniques
- Cut over a joint that limits movement
- Loss of sensation or movement below the cut
- Signs of infection developing (redness, warmth, pus, fever, red streaks)
- Bite wounds (animal or human)—high infection risk
🦶 Sprains, Strains & Joint Injuries
Twisted ankles are the most common backcountry injury I treat. The difference between a minor setback and a trip-ending injury often comes down to immediate care and knowing when someone can continue hiking versus when they need evacuation.
Understanding the Injury
- Sprain: Stretched or torn ligament (connects bone to bone)—most common in ankles, knees, wrists
- Strain: Stretched or torn muscle or tendon (connects muscle to bone)—common in back, hamstrings, shoulders
-
Grading:
- Grade 1 (Mild): Stretched ligament, minimal swelling, can bear weight with discomfort
- Grade 2 (Moderate): Partial tear, moderate swelling and bruising, difficult to bear weight
- Grade 3 (Severe): Complete tear, severe swelling, cannot bear weight, joint instability
Field Assessment
Before treating, assess the injury:
- Mechanism of injury: How did it happen? Inversion (rolling outward) is most common for ankles
- Point tenderness: Where exactly does it hurt? Bone pain vs. soft tissue pain
- Swelling and bruising: Immediate swelling suggests more severe injury
- Range of motion: Can they move it? How much pain?
- Weight bearing: Can they put weight on it at all?
- Deformity: Does anything look wrong? Deformity suggests fracture or dislocation
- Circulation check: Pulse, sensation, and movement below the injury
The RICE Protocol (First 48-72 Hours)
This is your foundation for treating sprains and strains:
R - Rest
- Stop activity immediately—continuing on a sprain makes it worse
- Avoid weight-bearing for Grade 2-3 sprains
- For Grade 1, limited gentle movement is okay after initial rest
I - Ice
- Apply cold for 20 minutes, then 20 minutes off, repeat for first 2-3 hours
- In the backcountry: use cold creek water, snow, or wet bandana
- Never apply ice directly to skin—wrap in cloth
- Continue icing 3-4 times daily for first 48 hours
C - Compression
- Wrap with elastic bandage (ACE wrap) to reduce swelling
- Start below the injury and wrap upward in overlapping spirals
- Should be snug but not cutting off circulation—check pulse and sensation regularly
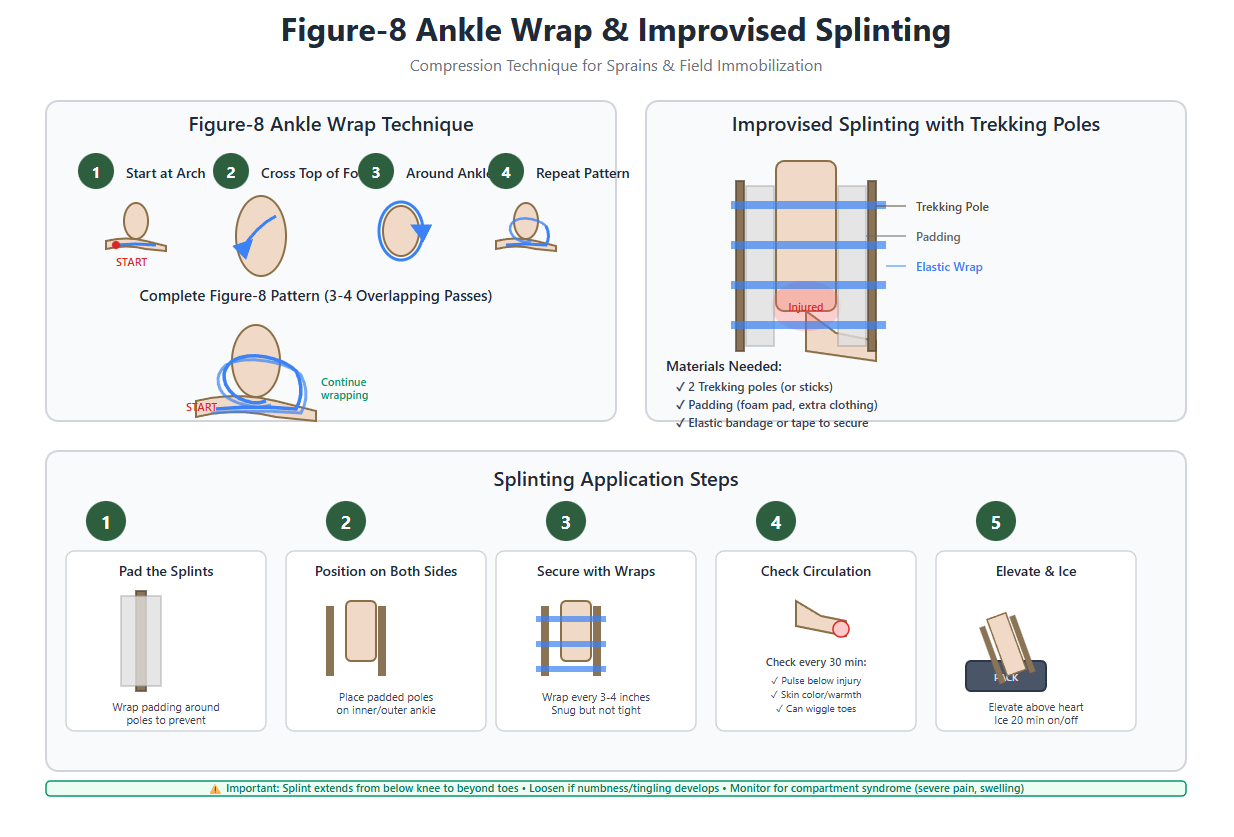
- For ankles: use figure-8 wrapping technique for best support
E - Elevation
- Elevate the injured area above heart level when resting
- Prop on pack or use sleeping bag as cushion
- This reduces swelling by using gravity to drain fluid
Splinting for Stability
For moderate to severe sprains or suspected fractures:
- Use SAM splint, cardboard, or improvise with trekking poles/sticks
- Pad the splint with clothing or foam pad
- Immobilize the joint in a neutral, comfortable position
- Splint should extend past the joints above and below the injury
- Secure with elastic wrap, tape, or cordage (not too tight)
- Check circulation every 30 minutes—loosen if needed
Walking Out: Can They Continue?
Decision matrix based on my field experience:
Can Continue with Support (Grade 1):
- Can bear weight with minimal pain after RICE treatment
- Minimal swelling (less than golf ball size)
- Good range of motion
- Stable joint (no wobbling or giving way)
- Short distance to exit (less than 5 miles)
Support methods: Tape ankle with athletic tape, tight lacing of boot for support, use trekking pole on opposite side, buddy carries pack weight, take frequent breaks with ice and elevation
Needs Evacuation (Grade 2-3):
- Cannot bear weight even with support
- Severe swelling (grapefruit size or larger)
- Significant deformity or instability
- Numbness, tingling, or color changes
- Getting worse despite treatment
- Long distance to exit
💡 Pro Tip: The 72-Hour Rule
Sprains often feel worst at the 24-48 hour mark due to delayed swelling and stiffness. If someone can walk on day one but can barely move it on day two, that's actually normal. Continue RICE protocol, gentle range-of-motion exercises (if not too painful), and anti-inflammatories. By day three, you should see improvement. If it's getting progressively worse, evacuate.
🦟 Insect Bites & Stings
From mosquitoes and horseflies to bees, wasps, and the occasional hornet encounter, insect bites are nearly inevitable in the backcountry. Most are just annoying, but some can be life-threatening for people with allergies.
Immediate Treatment for Stings (Bees, Wasps, Hornets)
- Remove the stinger ASAP: Scrape it out with a credit card, knife edge, or fingernail—don't pinch or pull with tweezers (squeezes more venom in)
- Clean the area: Soap and water to prevent infection
- Apply cold: Ice pack or cold compress for 10-15 minutes to reduce swelling and pain
- Topical treatment: Hydrocortisone cream, calamine lotion, or baking soda paste for itching
- Oral antihistamine: Benadryl (diphenhydramine) 25-50mg to reduce swelling and itching
- Pain relief: Ibuprofen or acetaminophen for pain
Treatment for Bites (Mosquitoes, Flies, Ticks)
- Don't scratch: This introduces bacteria and worsens inflammation
- Clean with soap and water
- Anti-itch treatments: Hydrocortisone cream, calamine lotion, or after-bite stick
- Cold compress: Reduces swelling and itching
- Antihistamine: Oral Benadryl if severe itching or multiple bites
Tick Removal (Critical for Lyme Disease Prevention)
- Use fine-tipped tweezers to grasp the tick as close to the skin as possible
- Pull upward with steady, even pressure (don't twist or jerk)
- Clean the area thoroughly with soap and water or rubbing alcohol
- Save the tick in a sealed bag with date/location if possible (for identification if symptoms develop)
- Watch for bullseye rash or flu-like symptoms in following weeks
🚨 Anaphylaxis: Life-Threatening Allergic Reaction
Recognize these signs immediately:
- Difficulty breathing, wheezing, or throat tightness
- Swelling of face, lips, tongue, or throat
- Rapid or weak pulse
- Dizziness, lightheadedness, or loss of consciousness
- Nausea, vomiting, or diarrhea
- Skin reactions: hives, itching, flushed or pale skin
IMMEDIATE ACTION REQUIRED:
- Administer epinephrine auto-injector (EpiPen) immediately – inject into outer thigh, hold for 10 seconds
- Call for emergency evacuation (satellite messenger, PLB)
- Have the person lie down with legs elevated (unless they're vomiting)
- Give Benadryl 50mg if they can swallow
- Monitor vital signs constantly
- Be prepared to give second dose of epinephrine after 5-15 minutes if no improvement
- Begin CPR if they become unresponsive and have no pulse
This is a true emergency—seconds matter. Evacuate immediately even if symptoms improve after epinephrine.
Prevention Strategies
- Insect repellent: DEET 20-30% or Picaridin 20% on skin; Permethrin on clothing/gear
- Clothing: Long sleeves, long pants, tucked into socks in tick country
- Camp smart: Avoid standing water (mosquitoes), camp in breezy areas, use bug netting
- Check for ticks daily: Full body check every evening, especially hairline, armpits, groin
- Know your allergies: If you have a known allergy to stings, carry TWO EpiPens and make sure your group knows how to use them
🔥 Burns (Fire, Sun & Heat)
Camp stove mishaps, grabbing hot pot handles, and severe sunburns are common in the backcountry. Understanding burn severity and proper treatment can prevent infection and reduce scarring.
Burn Classification
- First-Degree (Superficial): Red skin, painful, no blisters—like a sunburn. Only affects outer layer of skin (epidermis).
- Second-Degree (Partial Thickness): Red, blistered, very painful. Affects epidermis and dermis. Blisters may appear immediately or within hours.
- Third-Degree (Full Thickness): White, brown, or charred skin. May be surprisingly painless (nerve damage). Affects all skin layers. REQUIRES EVACUATION.
Treatment for First-Degree Burns
- Cool the burn: Run cool (not ice cold) water over the area for 10-20 minutes, or apply cool wet compresses
- Gentle cleaning: Mild soap and water once cooled
- Moisture: Apply aloe vera gel, burn ointment, or plain petroleum jelly
- Protect: Cover loosely with sterile gauze if clothing will rub it
- Pain relief: Ibuprofen or acetaminophen
- Hydration: Drink extra water (burns increase fluid loss)
Treatment for Second-Degree Burns
- Cool the burn: 15-20 minutes of cool water (NEVER use ice)
- Don't pop blisters: Intact blisters provide natural protection and reduce infection risk
- Clean gently: If blister ruptures, clean with mild soap and water
- Apply antibiotic ointment: Prevent infection (triple antibiotic or silver sulfadiazine if available)
- Non-stick dressing: Cover with non-adherent gauze pad (not cotton balls—they stick)
- Secure dressing: Wrap with gauze or medical tape
- Change dressing daily: Inspect for infection, reapply ointment
- Elevate if possible: Reduces swelling
⚠️ When to Evacuate for Burns
- Any third-degree burn
- Second-degree burns larger than your palm (3-4 inches)
- Burns on face, hands, feet, genitals, or over major joints
- Burns that go all the way around a limb (circumferential)
- Burns showing signs of infection (increased redness, pus, fever, red streaks)
- Electrical or chemical burns
- Any burn in a child or elderly person
Sunburn Prevention & Treatment
Prevention (much easier than treatment):
- Sunscreen: SPF 30+ broad spectrum, reapply every 2 hours (more often if sweating/swimming)
- Protective clothing: Long sleeves, wide-brim hat, neck gaiter, sun gloves
- Timing: Avoid peak sun hours (10am-4pm) when possible
- Higher elevations = more UV exposure—be extra diligent above 8,000 feet
Treatment for Severe Sunburn:
- Cool compresses or cool baths (not ice)
- Aloe vera gel (cooling gel formulas work best)
- Hydrocortisone cream for inflammation
- Ibuprofen for pain and inflammation
- Drink LOTS of water—sunburn dehydrates you
- Avoid further sun exposure while healing
- Don't pop sunburn blisters if they form
❄️ Hypothermia & Frostbite
Cold injuries kill more backcountry travelers than most people realize. The dangerous part? Hypothermia can occur in 50°F weather if you're wet and it's windy. I've treated hypothermia in August in Montana.
Understanding Hypothermia
Hypothermia occurs when your core body temperature drops below 95°F (35°C). It progresses through stages:
Mild Hypothermia (95-90°F / 35-32°C)
Signs:
- Shivering (intense and uncontrollable)
- Cold, pale skin
- Confusion, poor judgment, apathy
- Fumbling hands, clumsiness
- Slurred speech
- Increased heart rate and breathing
Treatment:
- Get them out of the cold/wind/wet immediately
- Remove all wet clothing
- Insulate with dry clothes, sleeping bag, space blanket
- Warm the core first (chest, neck, head, groin) with warm water bottles, heat packs, or another person's body heat
- Give warm, sweet drinks if fully conscious (hot chocolate, sugar water)
- NO alcohol or caffeine
- Keep them horizontal (sitting up can cause shock)
Moderate Hypothermia (90-82°F / 32-28°C)
Signs:
- Shivering stops (DANGER SIGN)
- Severe confusion, drowsiness
- Weak pulse, slow breathing
- Blue or gray skin
- Dilated pupils
- Loss of coordination
Treatment:
- Same as mild, but MORE GENTLE—rough handling can cause cardiac arrest
- Do not give anything by mouth (aspiration risk)
- Handle extremely gently—no rough movement
- Begin evacuation IMMEDIATELY
- Continue rewarming during evacuation
Severe Hypothermia (<82°F / <28°C)
Signs:
- Unconscious or barely responsive
- Rigid muscles
- Barely detectable pulse and breathing
- May appear dead
Treatment:
- Check for pulse for a full minute (heart rate may be very slow)
- If no pulse, begin CPR (but be aware that they may have a pulse you can't detect)
- Handle EXTREMELY gently
- Insulate and rewarm but do NOT use active rewarming methods (hot water, heat packs)—this can cause rewarming shock
- Evacuate immediately with constant monitoring
- "Nobody is dead until they're warm and dead"—continue efforts until evacuated
🚨 Critical Hypothermia Facts
- The "Umbles": When someone starts to Mumble, Fumble, Stumble, or Grumble, they have hypothermia—act immediately
- Paradoxical Undressing: Severely hypothermic people may start removing clothes due to confused sensation of being hot—this is a critical sign
- Afterdrop: When you rewarm someone, cold blood from extremities returns to the core and can cause core temp to drop further—keep them horizontal and warm the core first
Frostbite: Recognition & Treatment
Frostbite is the freezing of body tissue, most common in fingers, toes, nose, ears, and cheeks.
Frostnip (Superficial)
- Pale or red skin
- Numbness or tingling
- Skin feels cold and firm to touch but tissue beneath is soft
- Treatment: Rewarm gently with skin-to-skin contact (hand in armpit, etc.), no tissue damage if treated early
Superficial Frostbite
- White or grayish-yellow skin
- Skin feels waxy and firm but tissue beneath still soft
- Numbness
- Blisters may form after rewarming
Deep Frostbite
- Skin is white, blue, or blotchy
- Hard and cold to touch—feels like frozen meat
- Complete numbness
- Tissue damage extends into deeper layers
- Dark blisters or tissue turns black after rewarming
Frostbite Treatment Protocol
- Get to shelter: Protect from further cold exposure
- CRITICAL DECISION: Only rewarm if there's NO chance of refreezing. Freeze-thaw-freeze causes massive tissue damage. If there's risk of refreezing, keep it frozen until you reach definitive care.
- Remove constricting items: Rings, watches, tight boots
- Rewarming method: Use warm water bath (98-102°F / 37-39°C)—test with your elbow. Water should feel comfortably warm, not hot.
- Soak for 20-30 minutes: Tissue will be soft and color returns. This is EXTREMELY painful—expect screaming. Give pain medication before rewarming if possible.
-
After rewarming:
- Pat dry gently (don't rub)
- Separate fingers/toes with sterile gauze
- Cover loosely with dry, sterile dressing
- Elevate to reduce swelling
- Give ibuprofen for pain and inflammation
- Don't break blisters
- NO walking on frostbitten feet if you can avoid it
- Evacuate: All frostbite cases should be seen by medical professionals
⚠️ What NOT to Do
- Don't use direct heat (fire, stove, heating pad)—causes burns
- Don't rub or massage frostbitten tissue—causes more damage
- Don't rewarm with dry heat
- Don't walk on frostbitten feet unless absolutely necessary
- Don't allow refreezing after rewarming
- Don't drink alcohol or smoke (constricts blood vessels)
Prevention Strategies
- Layer properly: Moisture-wicking base, insulating mid-layer, windproof/waterproof shell
- Stay dry: Wet = cold. Change out of sweaty clothes, waterproof your gear
- Protect extremities: Quality gloves, warm socks, insulated boots, face mask, hat
- Eat and drink: Your body needs fuel to generate heat. Stay hydrated.
- Stay active: Movement generates heat, but don't sweat
- Know the wind chill: Wind makes cold exponentially more dangerous
- Watch for the warning signs: Numbness, tingling, white spots on skin—address immediately
💧 Dehydration & Heat-Related Illness
Heat injuries sneak up on you. One minute you're fine, the next you're dizzy and confused. In dry climates like Montana, you can be severely dehydrated before you even feel thirsty because sweat evaporates so quickly.
Dehydration: The Foundation of Heat Illness
Every heat-related emergency starts with dehydration. Your body needs water to sweat and cool itself.
Signs of Mild Dehydration:
- Thirst (by the time you're thirsty, you're already dehydrated)
- Dark yellow urine (should be pale yellow to clear)
- Decreased urination
- Dry mouth and lips
- Fatigue
- Headache
Signs of Moderate to Severe Dehydration:
- Dizziness or lightheadedness
- Rapid heartbeat
- Rapid breathing
- Sunken eyes
- No tears when crying
- Very dark urine or no urination for 8+ hours
- Confusion or irritability
Treatment:
- Drink water with electrolytes (sports drink, electrolyte tabs, or add pinch of salt to water)
- Sip slowly—0.5-1 liter per hour maximum (too fast causes cramping and vomiting)
- Rest in shade
- Cool down with wet cloths
- Continue drinking even after symptoms improve
Prevention:
- Drink BEFORE you're thirsty—aim for 0.5L per hour of moderate activity, more in heat
- Monitor urine color—pale yellow is the goal
- Replace electrolytes, not just water (salt, potassium, magnesium)
- Avoid alcohol and excessive caffeine (both dehydrate you)
Heat Exhaustion
The body's cooling system is failing but still functioning. This is serious but reversible with proper treatment.
Signs & Symptoms:
- Heavy sweating (key difference from heat stroke)
- Weakness or fatigue
- Dizziness or fainting
- Nausea or vomiting
- Headache
- Muscle cramps
- Cool, pale, clammy skin
- Fast, weak pulse
- Core temperature up to 104°F (40°C)
Treatment:
- Stop all activity immediately
- Move to shade or cool environment
- Remove excess clothing
- Lie down with legs elevated
- Apply cool, wet cloths to neck, armpits, and groin
- Fan for evaporative cooling
- Give cool water with electrolytes if conscious and not nauseous—sip slowly
- Monitor closely—if no improvement in 30 minutes or symptoms worsen, evacuate
- Do NOT resume activity until fully recovered (24+ hours)
Heat Stroke: Life-Threatening Emergency
The body's cooling system has completely failed. Core temperature rises rapidly and can cause organ damage and death. This is a TRUE EMERGENCY.
Signs & Symptoms:
- Hot, DRY skin (NO sweating)—this is the key difference from heat exhaustion
- Core temperature above 104°F (40°C)
- Confusion, altered mental status, or agitation
- Slurred speech
- Seizures
- Loss of consciousness
- Rapid, strong pulse initially (may become weak)
- Rapid, shallow breathing
- Sometimes: continued sweating in exertional heat stroke
🚨 HEAT STROKE PROTOCOL - ACT IMMEDIATELY
- Call for emergency evacuation NOW—satellite messenger, PLB, send runner
-
Begin rapid cooling IMMEDIATELY:
- Move to shade
- Remove all excess clothing
- Immerse in cold water if available (stream, lake) up to neck
- If no water immersion: apply ice packs or cold wet towels to neck, armpits, groin
- Fan aggressively for evaporative cooling
- Goal: Lower core temp to 102°F as quickly as possible
- Do NOT give fluids by mouth if confused or unconscious (aspiration risk)
- If unconscious: Place in recovery position, monitor airway and breathing, be prepared to perform CPR
- Continue cooling during evacuation
- Monitor constantly: Heat stroke can cause seizures, cardiac arrest, and death
Even if they seem to recover, evacuate—organ damage may not be immediately apparent.
Prevention: Don't Let It Get There
- Acclimatization: Takes 1-2 weeks to adjust to hot conditions—take it easy at first
- Hydration: Drink before, during, and after activity—aim for clear to pale yellow urine
- Timing: Avoid strenuous activity during peak heat (10am-4pm)
- Clothing: Light colors, loose fit, moisture-wicking fabrics, wide-brim hat
- Breaks: Rest in shade every hour, cool off with water
- Watch each other: Heat illness affects judgment—you may not realize you're in trouble
- Know the risk factors: Obesity, poor fitness, illness, certain medications, alcohol, age, previous heat illness
🦴 Fractures & Broken Bones
A fracture in the backcountry is always serious. Your job is to immobilize it, manage pain, and get the person to definitive care. I've splinted everything from fingers to femurs—here's what works.
Types of Fractures
- Closed (Simple) Fracture: Bone is broken but skin is intact. Lower infection risk.
- Open (Compound) Fracture: Bone breaks through the skin or there's a wound over the fracture. HIGH infection risk—requires immediate evacuation.
- Greenstick Fracture: Partial fracture (bone bends and cracks)—common in children
- Comminuted Fracture: Bone is shattered into multiple pieces
- Hairline Fracture: Thin crack in the bone—may not be obvious without X-ray
How to Assess a Potential Fracture
In the field without X-rays, you're making educated guesses based on signs:
Definite Signs of Fracture:
- Visible deformity—bone at wrong angle, limb looks wrong
- Bone protruding through skin (open fracture)
- Crepitus—grinding or crunching sensation when moved
- Loss of normal function—can't use the limb at all
Probable Signs of Fracture:
- Severe pain localized to one spot (bone pain vs. soft tissue pain)
- Significant swelling immediately after injury
- Rapid bruising
- Point tenderness directly over bone
- Unable to bear weight (for leg fractures)
- Extreme pain with gentle movement
Rule of thumb: If you can't rule out a fracture, treat it like one. Better to over-immobilize than under-protect.
Initial Assessment & Treatment
- Don't move them initially: Assess where they are unless in danger
-
Check circulation below the injury:
- Pulse: Can you feel it?
- Sensation: Can they feel touch?
- Movement: Can they wiggle fingers/toes?
- Color: Pink or pale/blue?
- Temperature: Warm or cold?
- Control bleeding if present: Apply pressure with sterile dressing
- Cover open fractures: Use sterile dressing, don't try to push bone back in
- Pain management: Give ibuprofen or stronger pain medication if available
Splinting: The Foundation of Fracture Care
Splinting Principles:
- Immobilize the joints above and below the fracture
- Splint in the position found (don't try to realign unless circulation is compromised)
- Pad all bony prominences
- Check circulation before and after splinting
- Secure firmly but not so tight that it cuts off circulation
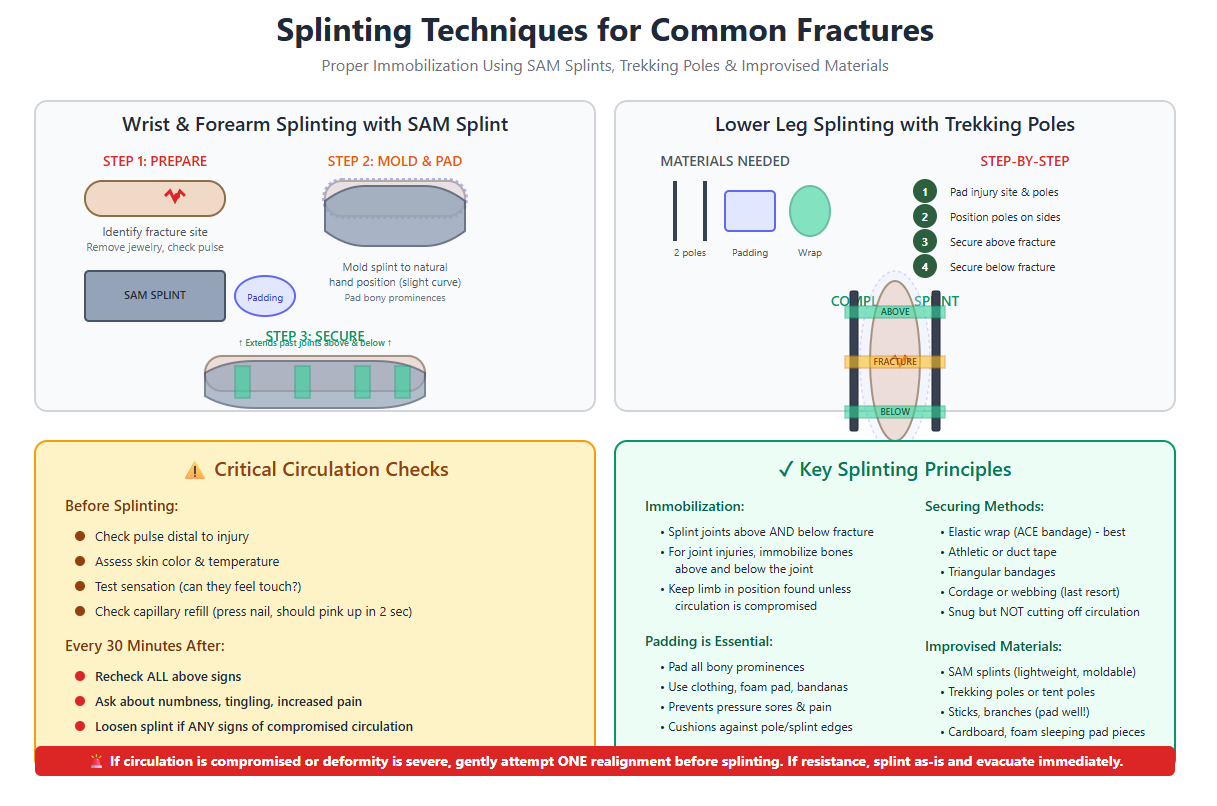
Improvised Splinting Materials
In the backcountry, you work with what you have:
- SAM splint: Moldable aluminum foam splint—every backcountry first aid kit should have one
- Trekking poles: Excellent rigid splints for arm or leg fractures
- Foam sleeping pad: Cut and rolled for padding and support
- Sticks/branches: Rigid support (pad well)
- Cardboard: If you have it (rare in backcountry)
- Rolled clothing: Padding and support
- Bandanas, tape, cordage: Securing the splint
Splinting Specific Fractures
Arm/Forearm Fractures:
- Support the arm at the elbow and wrist
- Place padded splint along the underside of forearm (SAM splint or poles)
- Secure with elastic wrap or tape at multiple points
- Create a sling with bandana or shirt to support at the neck
- Bind the arm to the body with another wrap for stability
Ankle/Lower Leg Fractures:
- Remove boot only if severe swelling is cutting off circulation (otherwise leave it—it provides support)
- Place SAM splint or padded poles on both sides of leg
- Extend from above knee to beyond foot
- Pad ankle and bony areas generously
- Wrap with elastic bandage in figure-8 around foot and ankle
- Elevate when resting
Collarbone (Clavicle) Fracture:
- Support arm in sling with elbow at 90 degrees
- Bind arm to body with wrap around chest
- Person can often walk out with support
Finger Fractures:
- Straighten gently if circulation is compromised
- Tape to adjacent finger ("buddy taping") with padding between
- Or splint with small stick and tape
🚨 IMMEDIATE EVACUATION Required For:
- Open (compound) fractures—bone through skin
- Femur (thigh bone) fractures—can cause life-threatening internal bleeding
- Hip or pelvis fractures—same reason
- Spine fractures—risk of paralysis
- Skull fractures—brain injury risk
- Any fracture with loss of pulse/sensation below the injury—circulation compromise
- Multiple fractures—higher shock risk
Pain Management
- Ibuprofen: 400-800mg every 6-8 hours (reduces pain and inflammation)
- Acetaminophen: 500-1000mg every 6 hours (can combine with ibuprofen)
- Ice: 20 minutes on, 20 off for first 48 hours
- Elevation: Reduces swelling and pain
- Immobilization: Good splinting reduces pain significantly
- Prescription pain meds: If you carry them, this is when they're useful (follow dosing carefully)
Monitoring During Evacuation
Check every 30 minutes:
- Circulation: Pulse, color, warmth below the injury
- Sensation: Can they still feel touch?
- Movement: Can they wiggle fingers/toes?
- Pain level: Increasing pain may indicate swelling or compartment syndrome
- Splint security: Shifting can cause more damage
If circulation deteriorates, loosen the splint slightly. If it doesn't improve, you may need to gently realign the limb—but this is advanced and risky.
🚑 Recognizing & Treating Shock
Shock is the body's response to inadequate blood flow to organs and tissues. It can develop from severe injuries, bleeding, allergic reactions, or even severe dehydration. Untreated shock can be fatal even if the original injury wasn't.
Types of Shock
- Hypovolemic Shock: From blood loss or severe dehydration—most common in trauma
- Cardiogenic Shock: Heart can't pump effectively—heart attack, chest trauma
- Anaphylactic Shock: Severe allergic reaction causes blood vessel dilation
- Neurogenic Shock: Spinal injury affects blood vessel control
- Septic Shock: Severe infection (rare in backcountry but possible with untreated wounds)
Signs & Symptoms of Shock
Early Signs:
- Rapid pulse (over 100 bpm)
- Rapid breathing (over 20 breaths/min)
- Pale, cool, clammy skin
- Anxiety or restlessness
- Thirst
- Weakness
Progressive Signs:
- Weak, thready pulse
- Shallow, rapid breathing
- Blue lips and fingernails (cyanosis)
- Confusion, altered mental status
- Dull, sunken eyes
- Dilated pupils
Late Signs (Critical):
- Loss of consciousness
- Extremely low blood pressure
- No urine output
- Mottled or bluish skin
- Absent or barely detectable pulse
Treatment for Shock
- Treat the cause: Stop bleeding, give epinephrine for anaphylaxis, stabilize injuries
- Lay them down: On their back with legs elevated 12-18 inches (unless they have head/chest injury or difficulty breathing)
- Maintain body temperature: Cover with blanket or sleeping bag, insulate from ground, but don't overheat
- Loosen restrictive clothing: Belts, tight collars, boots
- Do NOT give anything by mouth: Even if they're thirsty (risk of aspiration if they vomit or lose consciousness)
- Reassure and calm: Anxiety makes shock worse
- Monitor vital signs constantly: Pulse, breathing, consciousness level
- Evacuate immediately: Shock requires advanced medical care—it will not improve on its own
🚨 Critical Actions
- Never give them anything to drink—even if they beg for water
- Never leave them alone—shock can progress rapidly
- Don't delay evacuation while symptoms are mild—early shock is the time to move
- Be prepared for vomiting: Have them turn their head to the side or roll into recovery position if needed
- If unconscious: Place in recovery position (on side) unless spinal injury is suspected, then maintain in-line stabilization
🎒 Essential First Aid Kit Items
After a decade of treating injuries in the backcountry, here's what I actually use and what I consider essential vs. nice-to-have. Weight matters, but so does being prepared.
Wound Care & Bleeding Control
- Sterile gauze pads (4x4 and 2x2, multiple)
- Non-stick pads (Telfa) for burns and abraded skin
- Rolled gauze (2-inch and 4-inch)
- Medical tape (fabric or paper tape, 1-inch)
- Butterfly closures or Steri-Strips
- Elastic bandage (ACE wrap, 3-inch or 4-inch)
- Trauma pad or large absorbent dressing
- Hemostatic gauze (QuikClot or similar—for severe bleeding)
- Irrigation syringe (10-20cc)
Medications
- Pain/Inflammation: Ibuprofen 200mg (or stronger if prescribed)
- Pain/Fever: Acetaminophen 500mg
- Allergies/Antihistamine: Diphenhydramine (Benadryl) 25mg
- Antibiotic Ointment: Bacitracin
- Hydrocortisone Cream: 1% for itching, rashes, minor skin irritation
- Antacid: Tums or similar for stomach issues
- Anti-diarrheal: Imodium (loperamide)
- Aspirin: 81mg for heart attack symptoms
- Prescription EpiPen: TWO of them if anyone in group has severe allergies
Blister & Foot Care
- Moleskin (full sheet)
- Leukotape or athletic tape
- Second Skin (Spenco) or Compeed blister pads
- Tincture of benzoin (helps tape stick to skin)
Tools & Equipment
- Trauma shears or medical scissors
- Tweezers (fine-point for splinters, tick removal)
- Safety pins
- Thermometer (check for fever/hypothermia)
- SAM splint (foldable aluminum splint)
- Triangular bandage (sling, head wrap, tourniquet)
- Nitrile gloves (multiple pairs—protects you and patient)
- CPR face shield
- Headlamp or small flashlight
- Permanent marker (mark times on tourniquets, splints)
- Duct tape or Gorilla tape (multi-use)
Cleaning & Antiseptic
- Alcohol wipes
- Betadine or iodine wipes
- Hand sanitizer
- Soap (small biodegradable camping soap)
Specialized Items (Based on Trip)
- Prescription medications: Bring extra of any daily meds
- Altitude medication: Diamox for high-altitude trips
- Burn gel or dressing: For hot climates or fire-heavy camping
- Water purification: Backup for treating potential GI issues
- Wilderness medicine manual: Waterproof field guide
- Emergency communication: Satellite messenger (Garmin InReach, SPOT) or Personal Locator Beacon (PLB)
💡 Pro Tips for First Aid Kits
- Organize by category: Use small stuff sacks or ziplock bags labeled by use (blister care, wound care, meds)
- Know expiration dates: Check annually and replace expired items
- Practice before the trip: Open packages, practice applying bandages—don't figure it out in an emergency
- Customize for your group: More people = more supplies. Know any allergies or medical conditions.
- Keep it accessible: First aid kit should be easy to reach, not buried in the bottom of your pack
- Waterproof container: Dry bag or waterproof hard case
- Take a wilderness first aid course: A kit is only as good as your knowledge
📖 A Closing Story: When Preparation Saves Lives
My most memorable save wasn't dramatic—no helicopter rescue, no epic multi-day evacuation. It was a simple bee sting on a sunny August afternoon in the Scapegoat Wilderness, and it taught me why we carry the gear we carry.
Sarah, a 40-year-old teacher from Missoula, was hiking with our group when she swatted at what she thought was a mosquito. It was a yellow jacket, and it got her right on the forearm. She'd been stung before as a kid—no big deal, she said. We removed the stinger, applied a cold compress from the creek, and kept moving.
Five minutes later, she mentioned her throat felt "weird." I looked at her and saw hives spreading up her neck. Her breathing was getting rapid and shallow. We were three miles from the trailhead, and her mild childhood bee sting allergy had apparently evolved into something much more serious.
I sat her down immediately, had her lie back with legs elevated, and pulled out my first aid kit. Two EpiPens (I always carry two), Benadryl, emergency whistle, and satellite messenger. While my partner radioed for help, I administered the first EpiPen into her outer thigh—right through her hiking pants. Ten seconds of pressure, then I started a timer on my watch.
The change was almost immediate. Her breathing eased within a minute. The hives stopped spreading. But I knew from training that anaphylaxis can be biphasic—symptoms can return. I gave her 50mg of Benadryl, kept her lying down, monitored her pulse and breathing every 30 seconds, and had the second EpiPen ready in my hand.
Search and Rescue met us at the trailhead 90 minutes later. By then, Sarah was talking, joking even, but still flushed and shaky. The paramedic who took over told me I'd probably saved her life—without that EpiPen, she might not have made it to the trailhead. Sarah later told me she had no idea her childhood bee sting allergy was still active, let alone that it had worsened.
That day reinforced everything I believe about backcountry first aid: carry the right gear, know how to use it, and don't hesitate when the moment comes. A $30 EpiPen and a $15 box of Benadryl made all the difference between a scary story and a tragedy. Every first aid kit I pack now has two EpiPens, whether or not anyone in the group has a known allergy. You never know when you'll need it—and when you do, nothing else will work.
Final Thoughts
Backcountry first aid is as much about preparation and mindset as it is about bandages and splints. The best first aid is the kind you never have to use—stay alert, make conservative decisions, know your limits, and don't let ego override good judgment.
But when something does go wrong (and eventually, it will), your training and gear can make the difference between a manageable situation and a disaster. Take a wilderness first aid course. Carry a proper kit. Practice your skills. And remember: in the backcountry, you're the emergency room, the ambulance, and the ICU all rolled into one.
Stay safe out there.
📥 Download the One-Page Reference
Want a printable field reference? Download our Backcountry First Aid One-Pager (PDF) to carry with your kit.